Friday, October 28, 2011

Update soon

Sorry for the silence this last week and a half.  Life got a little crazy at the end of last week, and the computer I update from is on loan for a very important mission.  So, I will be back soon with some updates for you - including the craft fail... it turned into a craft success!!!!!!!

Thanks for hanging in there with me, I'll be back really soon.

Sunday, October 16, 2011

KCWC Days 1-6

Here's my recap so far on Kids Clothes Week Challenge from Elsie Marley:

Day 1 - Rested (I injured myself working last week so I had to skip Monday)

Day 2 - attached the sleeves to Marion's shirt for Halloween (tea dying tutorial here), made her Pebbles dress and Goy's Bam Bam bottom (just without the sash), made a sweater dress for Marion (tutorial here)


Day 3 - Finished Goy's Bam Bam costume (added sash and bone button), made marion's hair bone and bracelet (to mimic Wilma's necklace)


Day 4 - Rested, and got ready to do Potty Training with Goy

Day 5 - Marion's jeans - poor girl only had 1 pair of skinny jeans (in white) that fit... she needed some more.  I used Dana's pattern and used the flat front lines, and just shortened it since my kiddos have a bigger belly than hers :) and used a pair of Daddy's old worn out jeans to make.  I even put in a fake fly using embroidery floss in the same color as the seam at the bottom :) and a button.  I kept the original hem on the jeans to save a step and keep some detail, and tucked the excess material up with a hidden stitch so we can lengthen it as we go.


Day 6 - a craft fail - tried to make this Raglan T but used too big of a shirt for the pattern, so I have to take it all apart and size it down... will take a picture once I do that. 

After a break, I came back and made Marion this dress.  I found inspiration for it here and made my own pattern to make an A line dress, add the pleats at the bottom, and the collar and button at the top.  It's not perfect, but it looks great on her!  The best part... it's made from an old Oakley collard shirt Frankie bought me for my birthday when we were dating... so it's sentimental too and its probably the only Oakley toddler dress since they don't have a kids line :)


Stay tuned for Day 7, 8, 9 & 10 (it's supposed to be 10/10-17 but since I missed 2 days, I'll do it through the 19th).

Tuesday, October 4, 2011

2 Projects in 2 Hours

Would have been quicker if I didn't spend 20 minutes scared to cut the fabric.  I've never worked with fabric this expensive, and was so afraid, that I didn't touch it since I got it in February/March.  Yes, thats right, it sat for 7 months because I was scared.  Scared because it was expensive; scared because I'd heard it was hard to sew with... but I was afraid for nothing.  It was the easiest material I've ever sewn with, didn't slip, didn't bunch, hid my mistakes beautifully, and still came out as soft as when I started.


I won't go into too much detail since its a simple blanket, but I sewed them right sides together, clipped the edges, flipped them right side out through the 12 inch opening I left on one side, and did a zig-zag stitch around all the edges to finish it off and keep it square.  Can't wait for the kiddos to see them in the morning.


Next up, jeans for little miss.

Sunday, September 25, 2011

Sailor Girl Sweatshirt

Okay, Buddy Boy loved his sweatshirt and wanted to wear it ALL day, thankfully it was cool enough he could get away with it!

And after nap, he spotted Baby Girl's and got so excited... she was too excited and immediately asked to wear it.  What do you think?  Too much Navy, or just enough to be Patriotic :)


Saturday, September 24, 2011

Spring Training Sweatshirt

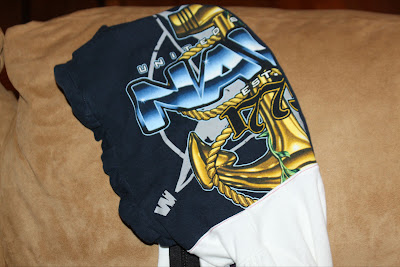
Okay, so I originally got the stuff to make these months ago from I Am Momma - Hear Me Roar, but I finally bit the bullet and did my first ever refashion project.  There are a few things I would do different next time (like having thread that matches my zipper and a zipper foot too), but overall, I'm really happy with it.  This is the first time I have ever attempted something so complex...

I used 3 different spring training shirts from 5-6 years ago that were wearing out and a turtleneck shirt from the clearance rack, knit ribbing and an exposed zipper.


I lined the hood because the spring training shirts were thinner than the turtleneck and I wanted it to give him some warmth.


And I love that you can see most of the graphic on this side of the hood (had to cut from the middle of the shirt and then attach the hem to finish it off nice, but with lining it, I was able to hide all of that pretty well.


He hasn't seen the finished product, but after I put the ribbing on the bottom, I tried it on him and he didn't want to take it off...  Hopefully tomorrow he'll love it even more (especially since the graphics and the hood came from Grampa & Gramma).

Now off to bed and tomorrow maybe I'll get baby girl's done (with girly touches of course!).

Thursday, September 22, 2011

Notes to ...

A friend's son recently left for a couple years and he told me that they are best friends.  I don't know about you, but I can't get through a day without calling mine at least 10 times :) sorry  mommy :).  So, I thought it would be nice for him to have some place small and simple to keep those little thoughts we want to share with our closest friend, but that might not come back to mind when we sit down to write a letter.  I didn't upload the finished product because it has a nice picture of them just before the son left but just add a picture in the middle of the white block and you've got the idea :).

I used stickers and then mod podged over them and the area I wanted to put the picture, placed the picture backing (seen below) down, and impatience won out - I didn't wait the 15 minutes I was supposed to, put another layer of mod podge down and put the picture in the center... didn't wait again, and mod podged over the whole thing to seal it.

The mod podge isn't all the way dry here, but you get the gist.

If I were sending this to a woman, I'd wrap it all pretty and put a bow on it, but since it's going to a man, I'm just going to wrap it in parchment paper when it dries and send it off that way.  Sometimes simple is best.

Wednesday, September 21, 2011

WE ARE GETTING A HOBBY LOBBY

I am so excited!  I have only ever been in one Hobby Lobby, but I fell in L.O.V.E!

Okay, so technically I'm not getting a Hobby Lobby, it's in Roseville :(, but its on the way to all our doctors :), so yes, I will claim this one as my own.  And besides, if I happen to be over there for doctors appointments (at least 4 times a year), then hey, why not stop in and browse right?  My husband just might kill me if I stretch my trips to Roseville any longer than I already do (leave the house between 6-7am and get back around 6pm - if I'm lucky), but come on, it's HOBBY LOBBY!!!!!!!!!!!!!!!!!!!!!!!!!!!!!!!!!!!!!!!!!!!

Did I mention I'm excited?

Stay tuned, I've got quite the list of projects I'm going to be working on in the next couple of weeks :).

Wednesday, September 14, 2011

Daddy Dates by Greg Wright

I knew that "Daddy Dates" by Greg Wright would be a good book for my husband to read before I even opened the cover, but I never expected to grow as a mother so much from just one book.  I had so many ah-ha moments throughout the book, not only for dealing with both my son (2.5 years old) and my daughter (1.5 years old), but for my growing up years.  I found myself many times thinking, yeah, that's totally what I was needing then.  And also found myself seeing so many things through my own Daddy's eyes, and being even more appreciative of all our daddy-daughter trips and nights out growing up, and looking forward to more of my own Daddy’s dates.  This book really hit home for me and I can't wait to see my husband and daughter (and future daughters) enjoy the Daddy Dating process.  Mr. Wright might not be done raising his girls yet, but he has set the foundation for honesty and trust in him and themselves, which is so important for any woman, no matter her age.

I highly recommend this book to any parent, no matter the age of your daughter, 2 months or 20 years old, “Daddy Dates” brings home to the reader the importance of instilling self-worth in your daughters and teaching her what she should expect from men who pursue her… and that yes, she should expect men to pursue her (at least the ones worth her time).

*I received this book for free in exchange for my unbiased review through the Thomas Nelson BookSneeze Program.

Thursday, July 7, 2011

Daddy's Day Gift - US!!!

In our house, Father's Day gifts tend to center around preserving something of our children for Daddy to enjoy.  This year he just moved into a new office where he actually had space on the wall for pictures.  So, the idea was born.  I'm sure there are tons of tutorials out there, and no I didn't read any (though that might have been a good idea).  I didn't have any batting, so it's not quite as nice as I would have liked, but it'll do.

Secured 2 pieces of cardboard together with glue and duct tape and then cut it down to 2'x3' to fill the space he had available.

Covered it with fabric just using my hot glue gun (rolled the edges twice to give it a cleaner finish).

Added ribbon in a crossing pattern using pins to secure it to the cardboard until it looked the way I wanted.


Hot glued the ribbon down on each end and then at the cross points (not all cross points are glued down - something I would do differently next time)


Then added pictures and secured his card to the top with a tack.

Thursday, June 16, 2011

Coming Back Soon!

Sorry I have been MIA for a month.  It's been a crazy one with confirmation of my daughter's severe peanut allergy.  It's been an education in of course all the new research I've been doing, but also in putting our trust in the Lord and keeping a joyful heart and life.  I have two projects I just finished last night and today that I will post about soon.  Probably Monday...

So stay tuned, I will be back with some awesome projects!

Thursday, June 9, 2011

Oh Happy Days Goes to Paris

So excited to share a chance to win a trip for 2 to Paris!!! Oh MY!!!!  Go check it out at Oh Happy Day and check out all her amazing stuff on her site, she is one talented Momma.


Oh Happy Day Goes to Paris

Thursday, May 19, 2011

Swimwear Giveaway

Today I stumbled across Sugar Bee Crafts and found an exciting giveaway.  Go check it out before Friday around noon.  You could win an awesome gift card to Hapari.


Photobucket

Monday, May 9, 2011

Brighten Up Any Mother's Day

I wanted to do something new for our moms for Mother's Day this year and something involving the kids, with materials I already had.  I saw (sorry, can't remember where - if it was your idea, leave a comment and I'll put in the link) an idea for Easter egg sun catchers using clear contact paper and colored tissue paper and letting the kids rip and stick down the paper how they want.  That doesn't work when you only have white tissue and Christmas themed tissue, or with a 2 year old and 1 year old.  So I decided to modify it for my kids and my supplies...

Enter the Heart Sun Catcher


Have your kids color a piece of white tissue paper with markers and crayons (the markers really showed up the best, but a combination makes for great variation in the finished product).

Cut out the shape you want from clear contact paper - hearts for us - in two sizes, one of the large size and two of the small.


Tear the tissue into strips, sections, whatever you want and crumple it a little as you stick it to the sticky side of the contact paper.  Keep going until you cover the contact paper.


Trim around the contact paper so all you have is your original shape.


Punch holes in the shapes where you want them to attach to the string/ribbon, and thread it through.  Put a loop at the top and you're ready to hang it up


Or wrap it in more tissue paper and put a sweet message on the front.  Our message was on two pink hearts "You Brighten Our Lives, We Love You" was on one and "We hope you enjoy the extra color our hearts add to your window" was on the other.  It was a big hit!!!


Photobucket

Tuesday, April 19, 2011

I'm One - Minnie Mouse Style

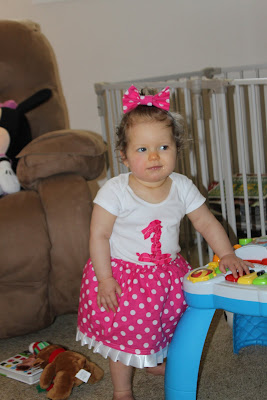
I knew for a while I wanted to do a Minnie Mouse (from Mickey Mouse Clubhouse) party for my daughter when she turned one.  We did a Mickey Mouse party for my son this year for his 2nd birthday and it was such a hit, plus she's just as into Mickey Mouse Clubhouse as he is.  I was shopping, browsing the fabric department and saw the perfect Minnie Mouse fabric in my daughter's best color.  Pink with white polka dots.  I immediately knew I was going to do a skirt, then I started planning her first birthday shirt, but since I didn't have any iron on transfers to do a cool shirt like my son's first year shirt (had his name, birth date, party theme and some other cool things), I was going to use my fabric paints to decorate her shirt and then put a cut out of Minnie's head with the polka dot fabric, but I let that go when I found that some ribbon I had at home was the exact same color as the fabric.  So her outfit was born...

I used her Minnie Mouse ears from her halloween costume and cut off that bow (refashioned it to clip in her hair for future outfits too), and attached a bow I made with the same fabric as the skirt.  After her party I removed the bow and attached it to a clip so she can continue to wear it with the skirt and not have to deal with the ears every time.  I made the skirt very simply by connecting two rectangles of fabric (the full width of her skirt and 9 inches long), hemming it, attaching a 1/2 inch elastic the size of her waist, and doing a quick pleating with white satin ribbon which I attached to the bottom of the skirt.  I didn't measure the pleats, just eyeballed it and I think it turned out great.  For her onesie, I ruffled some textured ribbon I had and attached it to the shirt in the shape of a 1.  It took 3 pieces of ribbon and I heat set the ends so it wouldn't fray in the wash (one of my pet peeves).  Now that her outfit was done I attacked her bib.  I couldn't find a good 1st birthday bib at the store, so I decided to tackle it and make my first ever bib.  I used a cream fabric I already had and a hand towel and quilted the two together to make the front, then I stitched on some black thin ribbon I had to say "I am" and the same textured ribbon as a "1".  I attached the same polka dot fabric to the back and created my own bias tape with extra fabric to stitch it all together, added hook and loop to the neck pieces and I was done.

My little Minnie with her ears. (I didn't make the tutu underneath, just had it on hand and thought it made the outfit).


Her bib just before cake (don't worry the stains came out very easily so I still have a great bib).


And her outfit without the ears, and showing off her onesie.

Photobucket